Hiking can take a toll on your body. Practicing yoga after a long day of trekking (or even during your training for a big hike) helps to stretch and relax the muscles. Yoga for hikers doesn’t have to be time-consuming or difficult. In this post, we’ll go over why hikers should do yoga and go share a few poses to help you loosen up post hike.
Why should hikers & Backpackers do yoga?
Ever heard of the “hiker hobble”? It’s when you take a break, get up in the middle of the night to pee, or get out of your tent in the morning and have to hobble around the campsite for a while before the muscles in your body are fully ready to start moving. It might be funny to watch, but to experience it firsthand sucks.
Yoga can help prevent the “hiker hobble” by:
- Loosening up your muscles and giving your body full range of motion.
- Strengthening your core.
- Improving your balance.
- Helping to prevent injuries while hiking
- Improving hiking endurance
- Making that mind and body connection stronger and helping to keep your positivity up.
But Retha, I don’t do yoga?! I’m not flexible!
You don’t have to be flexible to do yoga. Yoga benefits the body, mind, and spirit. For the purposes of this blog post, we’re going to focus just on the body. When doing yoga on the move remember that it is to stretch your legs, back, shoulders, anything that might be stiff. It is not about: doing a headstand or twisting yourself into a pretzel, even though both of those things sound pretty cool. Do what’s comfortable for your body. If you’re unable to do the poses as they are pictured below that’s OK, each person is different and the yoga poses will still help you even if you’re not not a rubber band.
Pin this Backpacking Yoga Post for Later

Things to keep in mind while doing Hiking & Backpacking yoga
You’re putting in long days, so remember to be gentle with yourself. If you do yoga on the regular your body might not feel the same on the trail as is does at home or in a yoga studio, so take it easy. The point of doing yoga after a long day of hiking is to help your body, not hinder it. Yes, I know I said this earlier, but I really can’t stress this enough.
Below you’ll find 11 yoga poses that my lovely yoga teacher, Edna Meyer, was so kind to help me put together for this post. If you’re ever in the Manchester, Vermont area you should come to one of her classes at the Manchester Recreation Center. She has the most amazing positive and calming vibes about her. Everyone should be lucky enough to have a yoga teacher like her!
These 11 yoga poses are designed as a yoga flow, so you should transition from one to the next as I’ll note in the how-to section of each pose. You’ll do each pose on both sides of your body, when you read through the how-tos I’ll let you know when to go back to the beginning to switch sides.
Read More: Hiking the Trans Catalina Trail
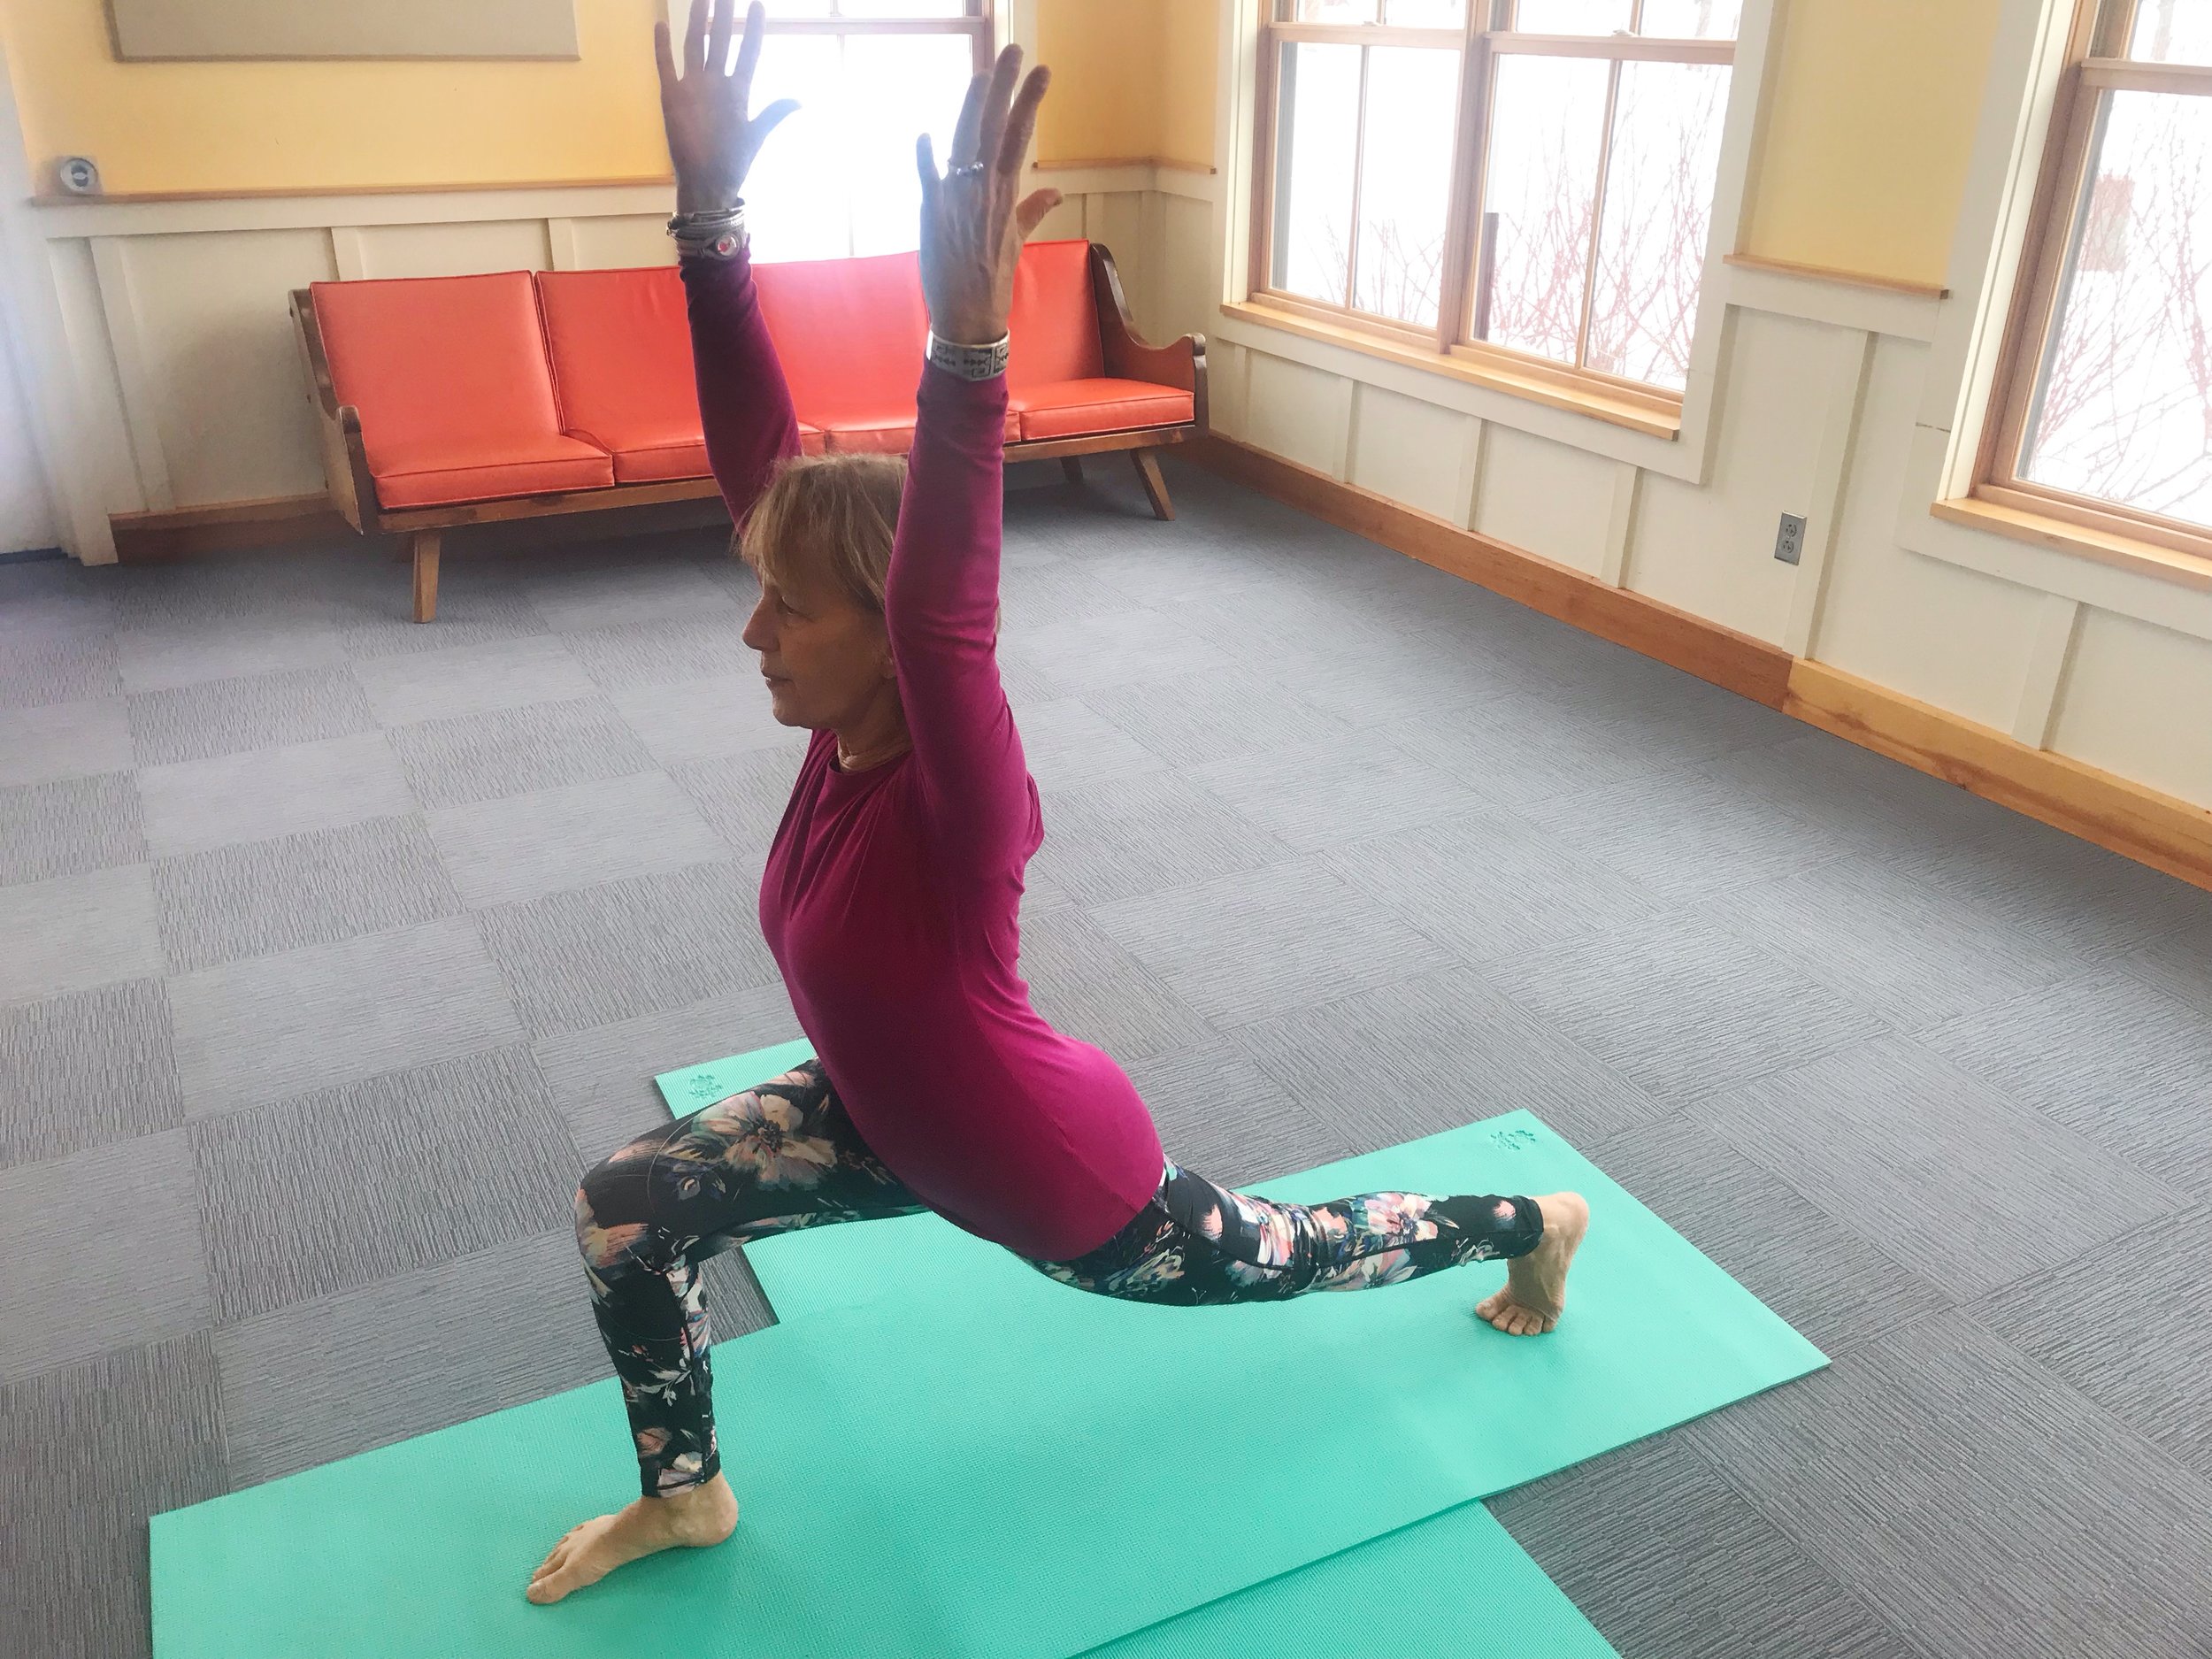
Hiker Yoga Pose #1 – Warrior 1
How-to: Stand with both feet hip width apart. Take a big step forward, and ensure your ankle and knee are in alignment. Push you back leg up towards the sky and to help you balance raise your arms above your head with your elbows even with your ears. Yours arms can be as wide as you want to help you balance.
Benefits: back, legs, arms, and energizes the body.
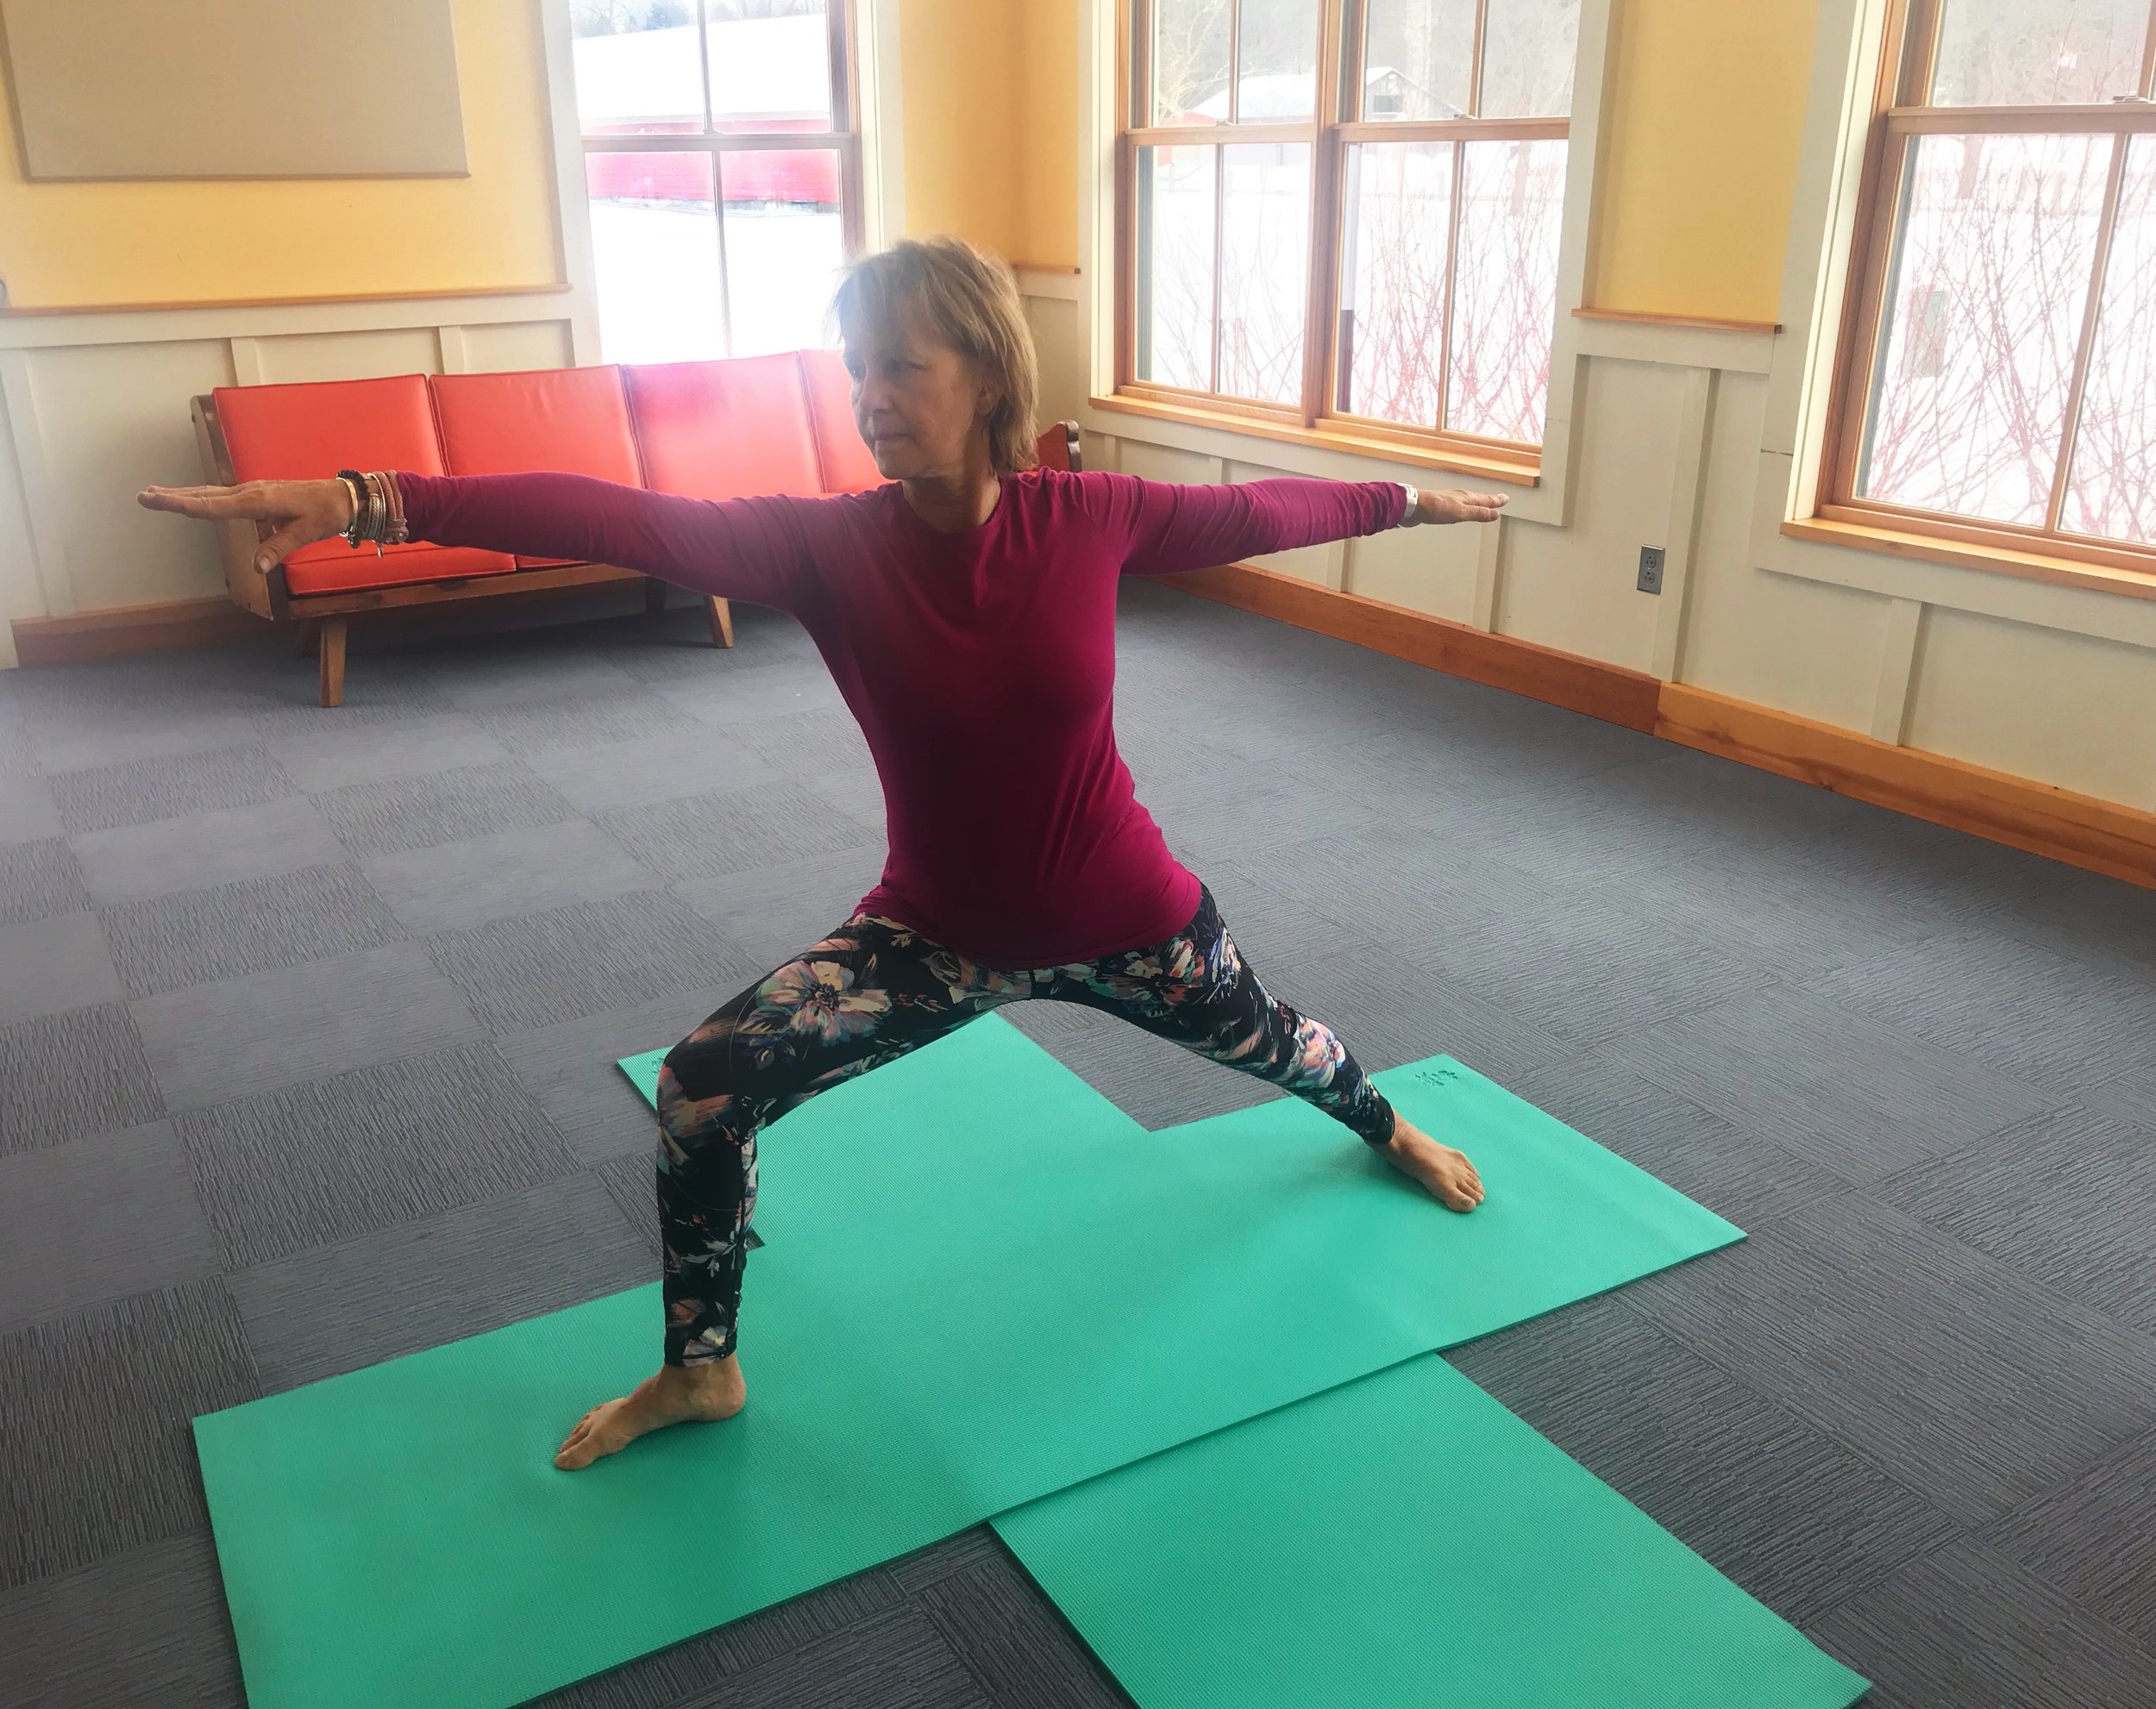
Hiker Yoga Pose #2 – Warrior 2
How-to: From the Warrior 1 position, straighten both legs, then pivot your back foot 90 degrees so it’s even with the back of your mat (if you are using one). From there t-out your arms so they’re even with your shoulders as if you are between 2 panes of glass. Last, bend your front foot so your ankle and knee are in alignment.
Benefits: back, legs, arms, and energizes the body.
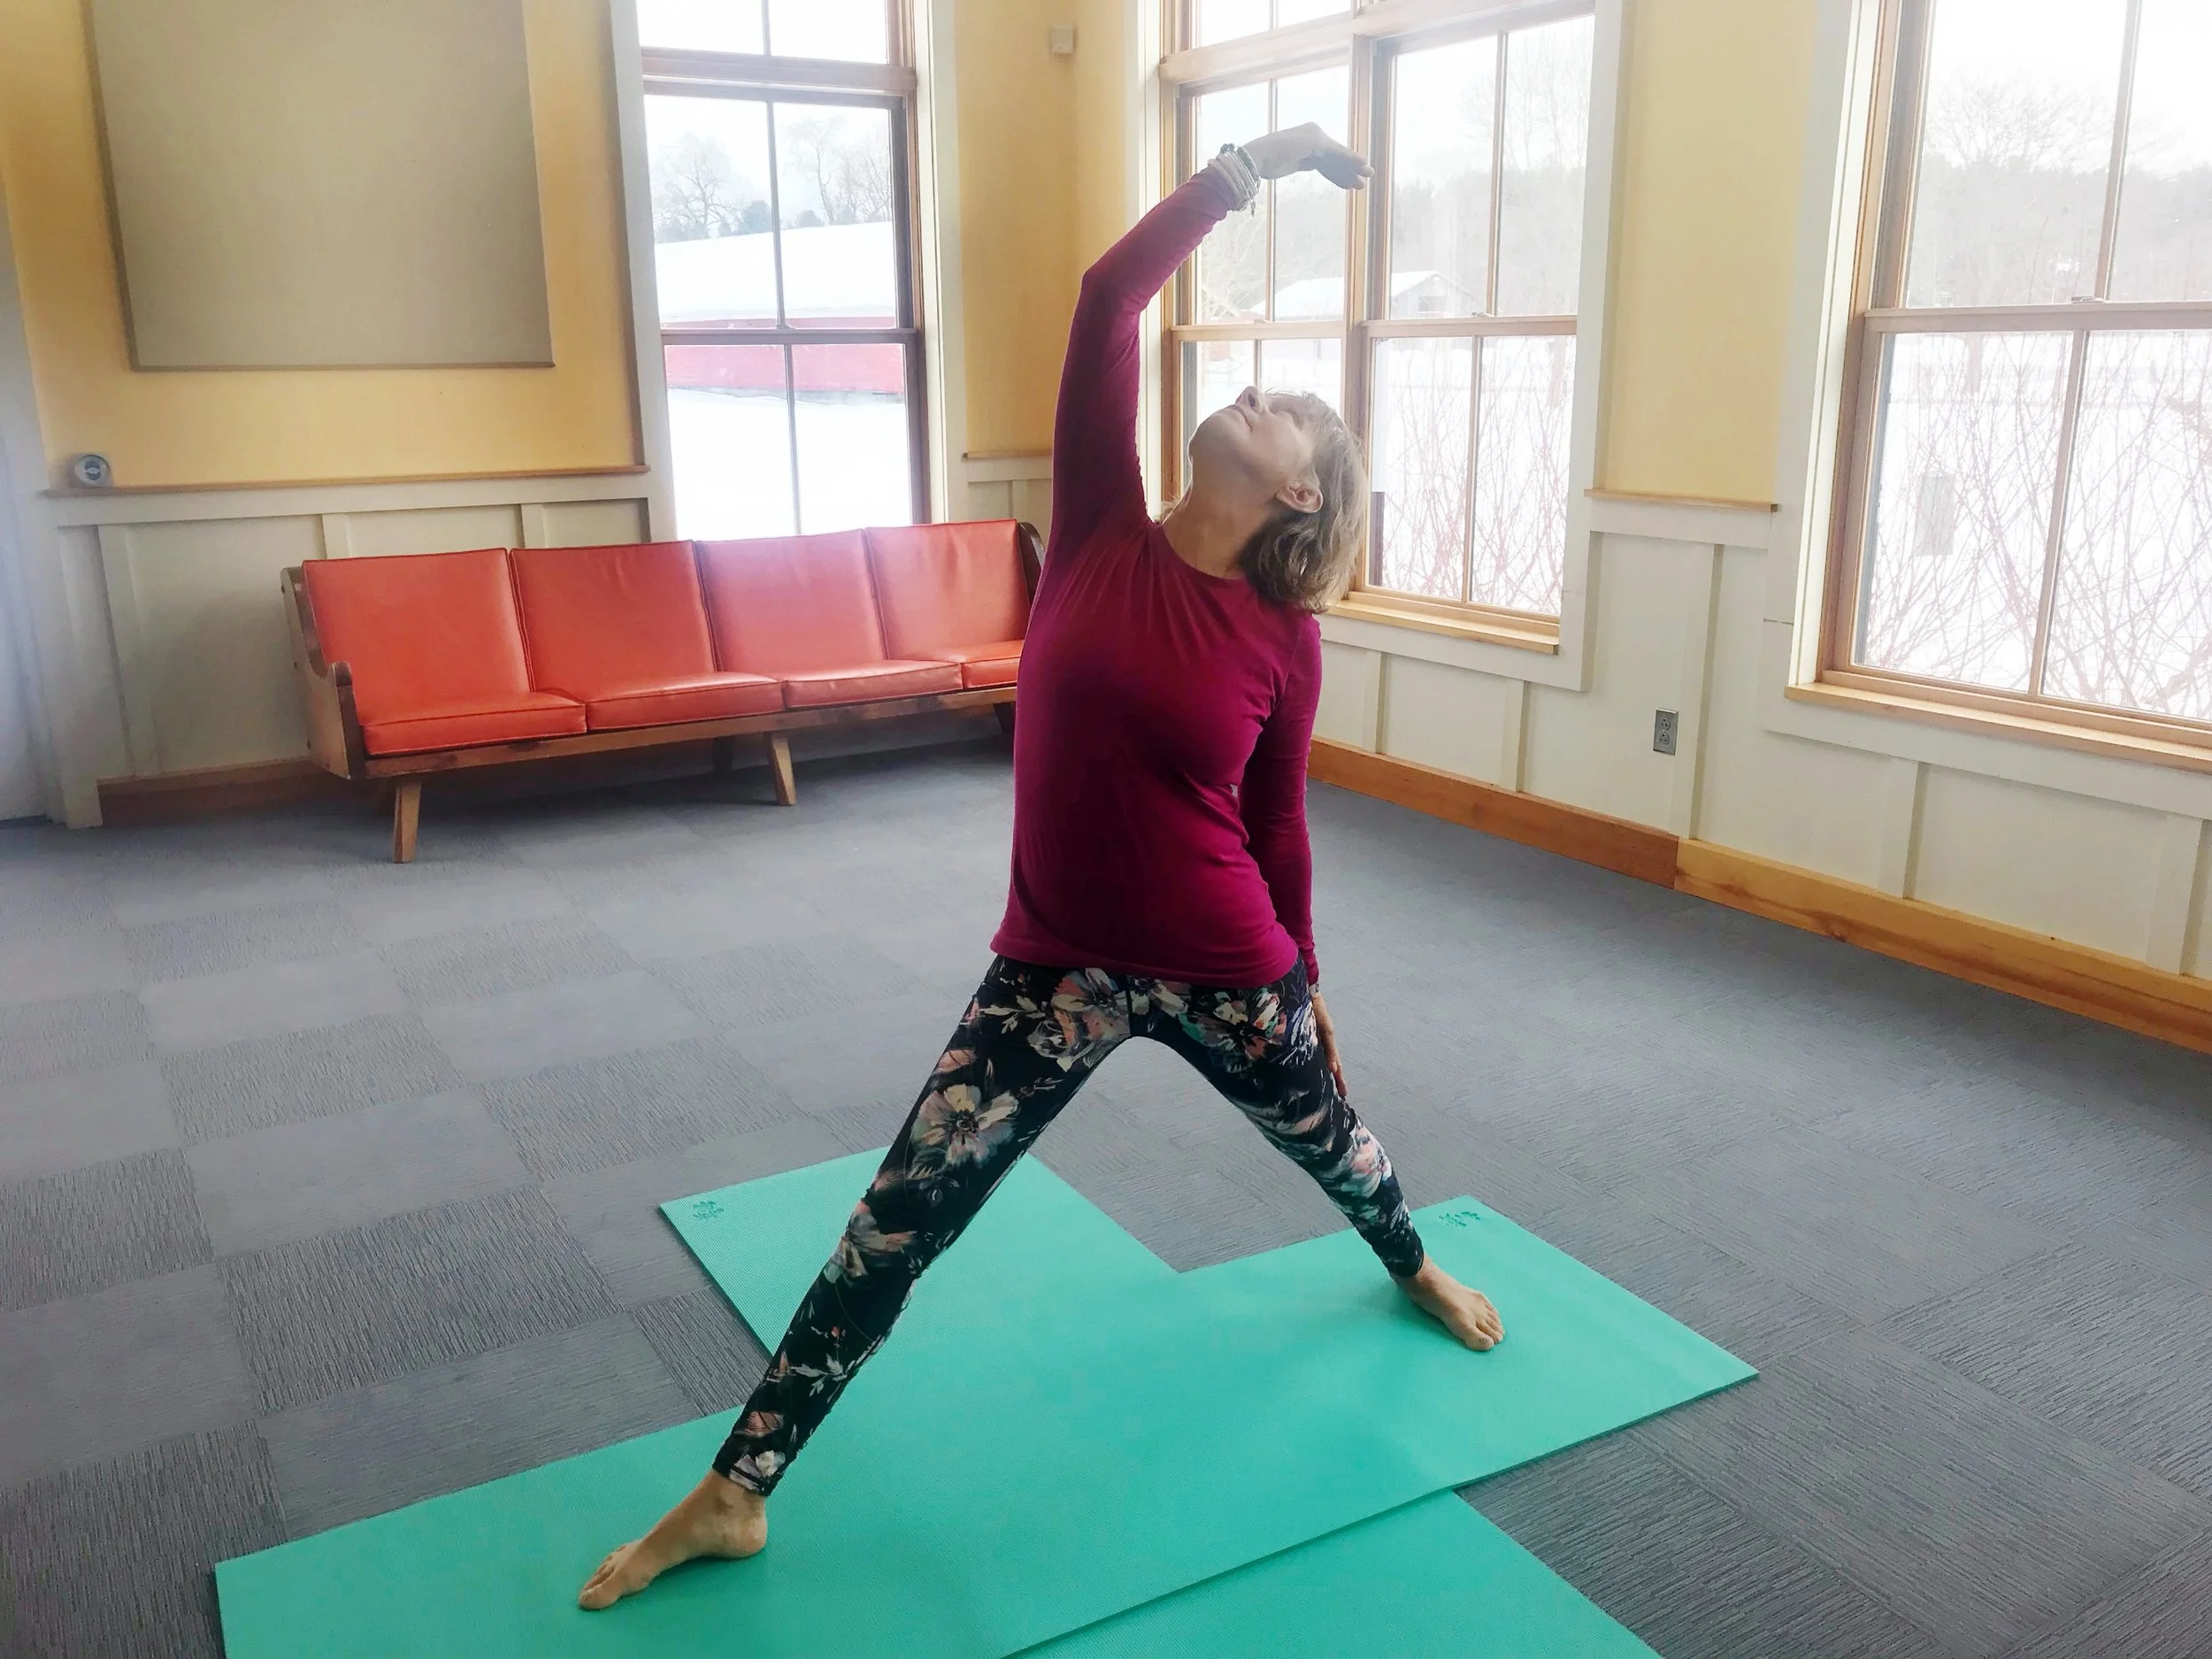
Backpacking Yoga Pose #3 – Stargazer
How-to: From the Warrior 2 position straighten front leg, raise front arm up above head with your palm down and lean back slightly as if looking at the stars. Back arm should go to the back leg helping to support the body. Feet should remain in same position.
Benefits: balance, back, arms, leg, and general strengthening
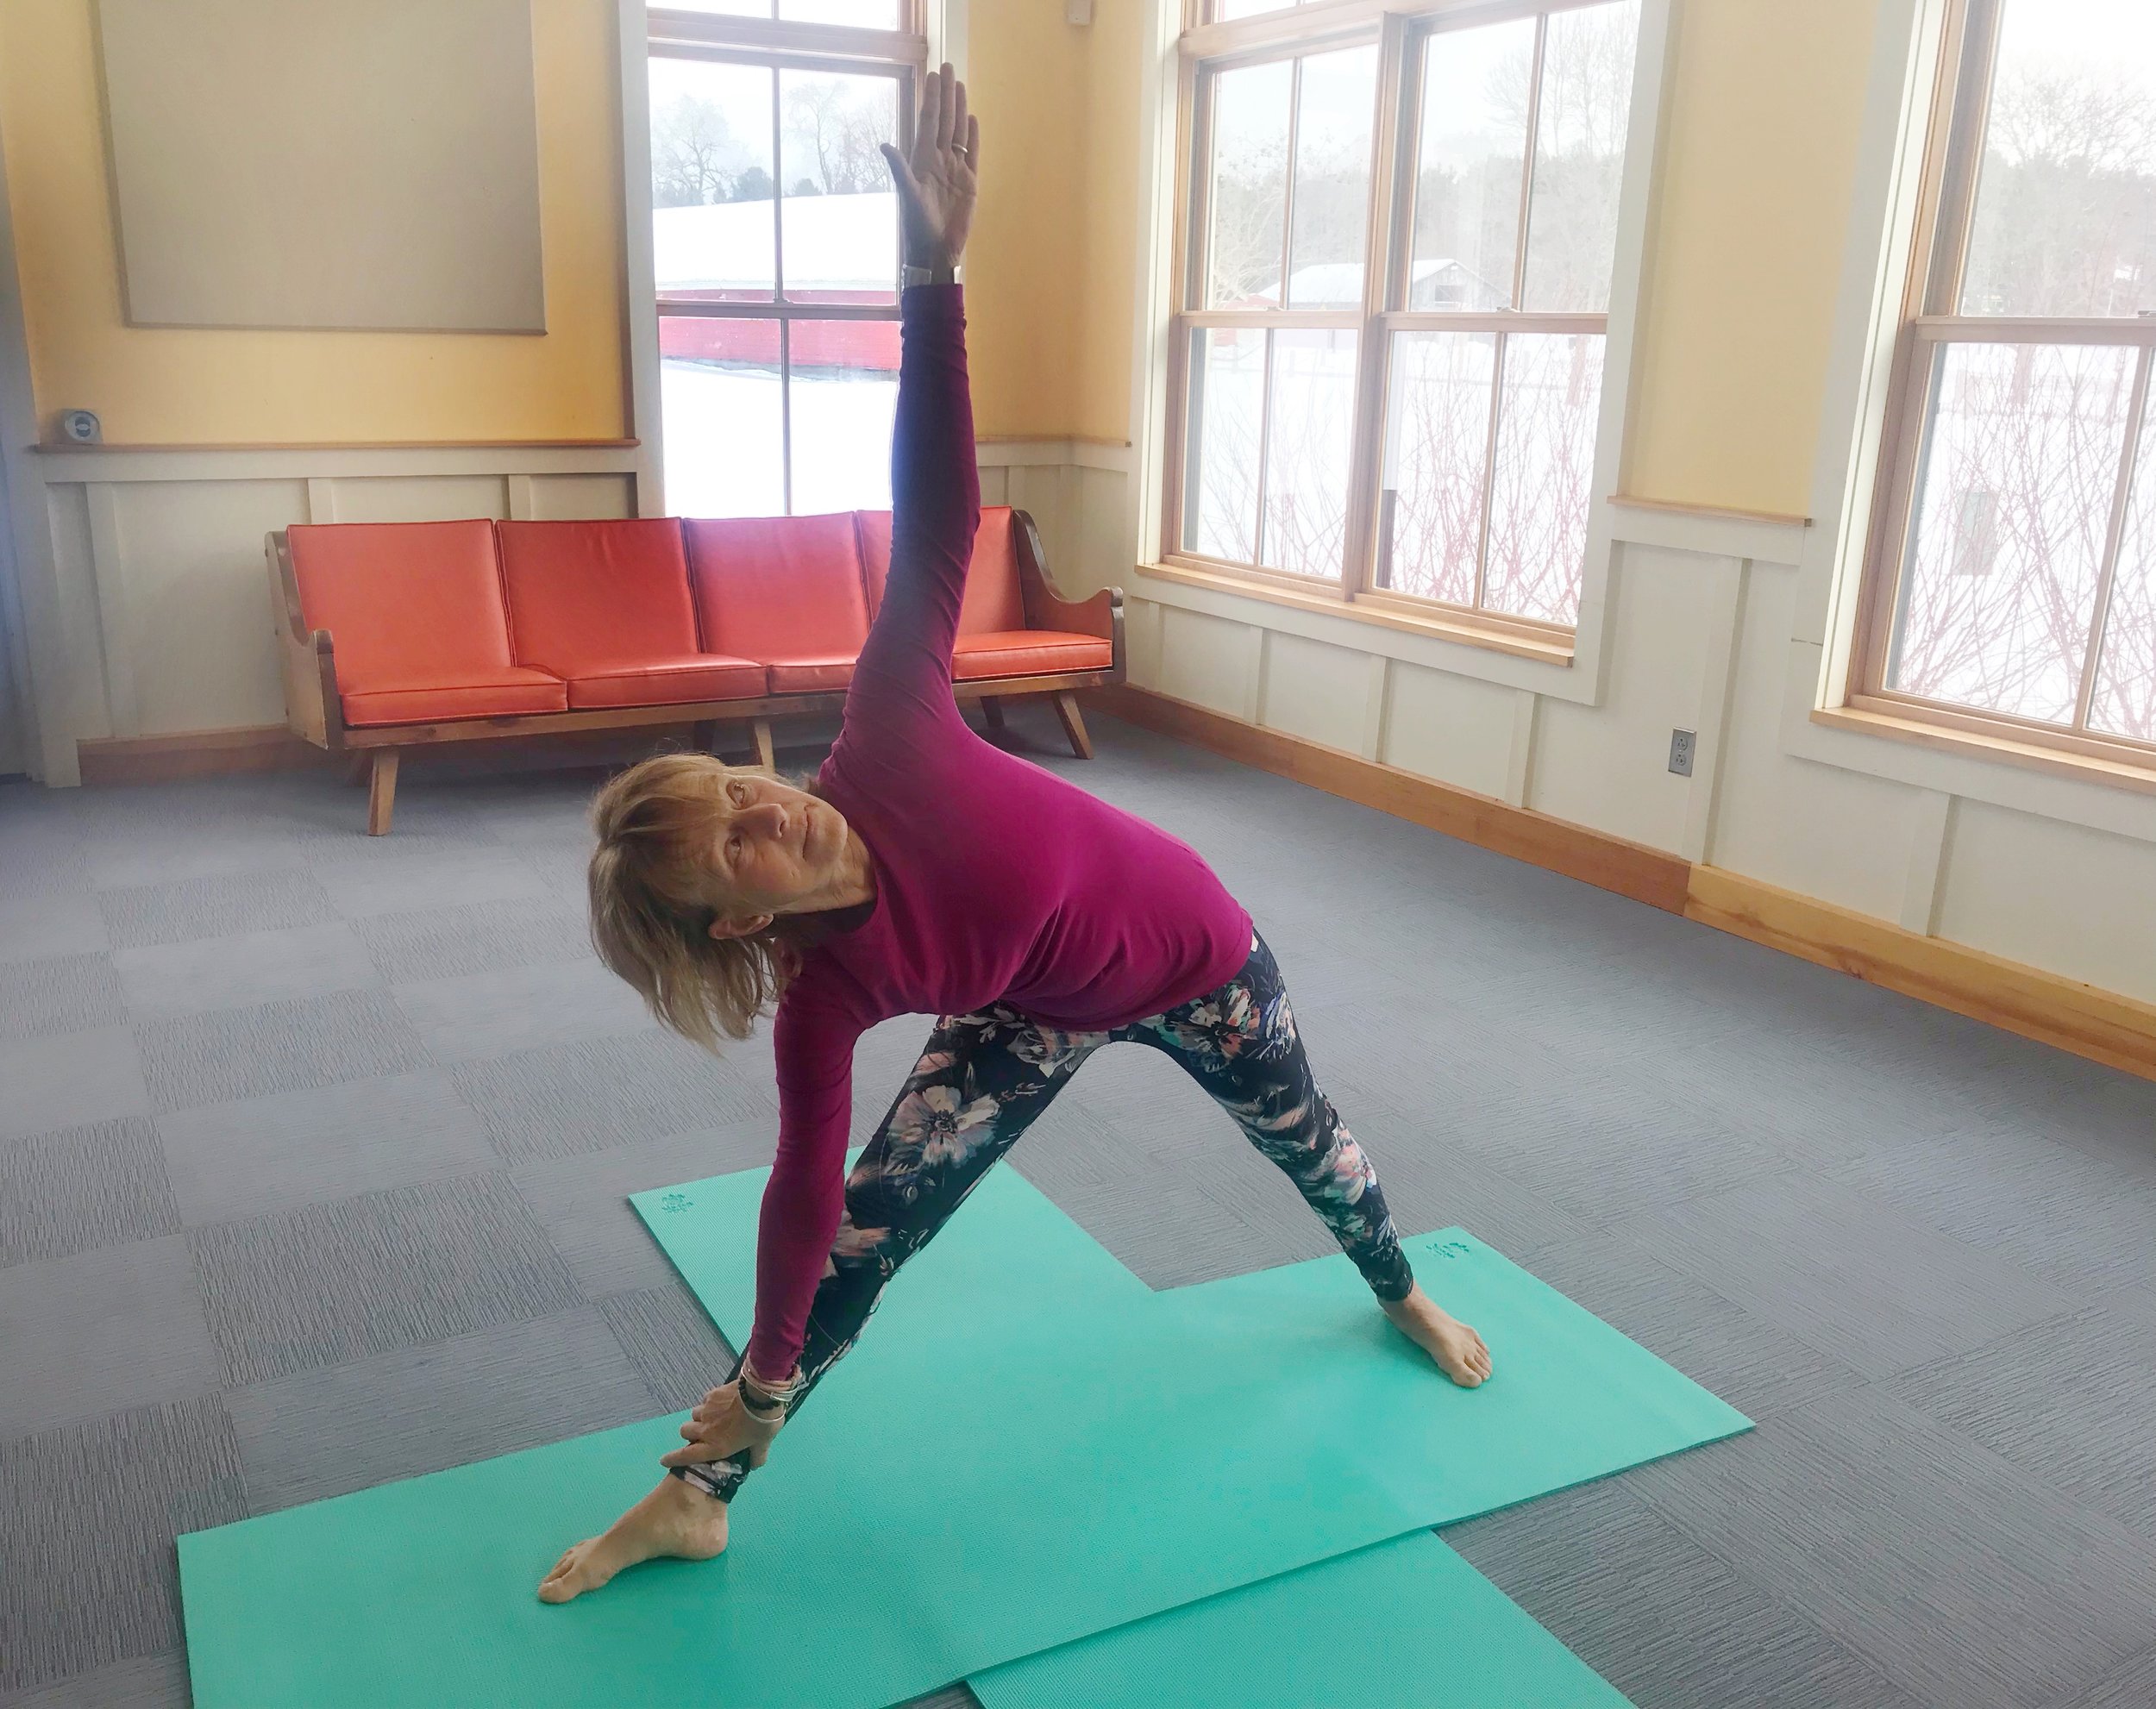
Hiker Yoga Pose #4 – Triangle
How-to: From Stargazer, lower upper hand down to the inside of the front foot as you bend at the hips. Back hand goes up to the sky with head tilted looking at the tips of your fingers. Feet should remain in same position.
Benefits: balance, back, arms, leg, and general strengthening
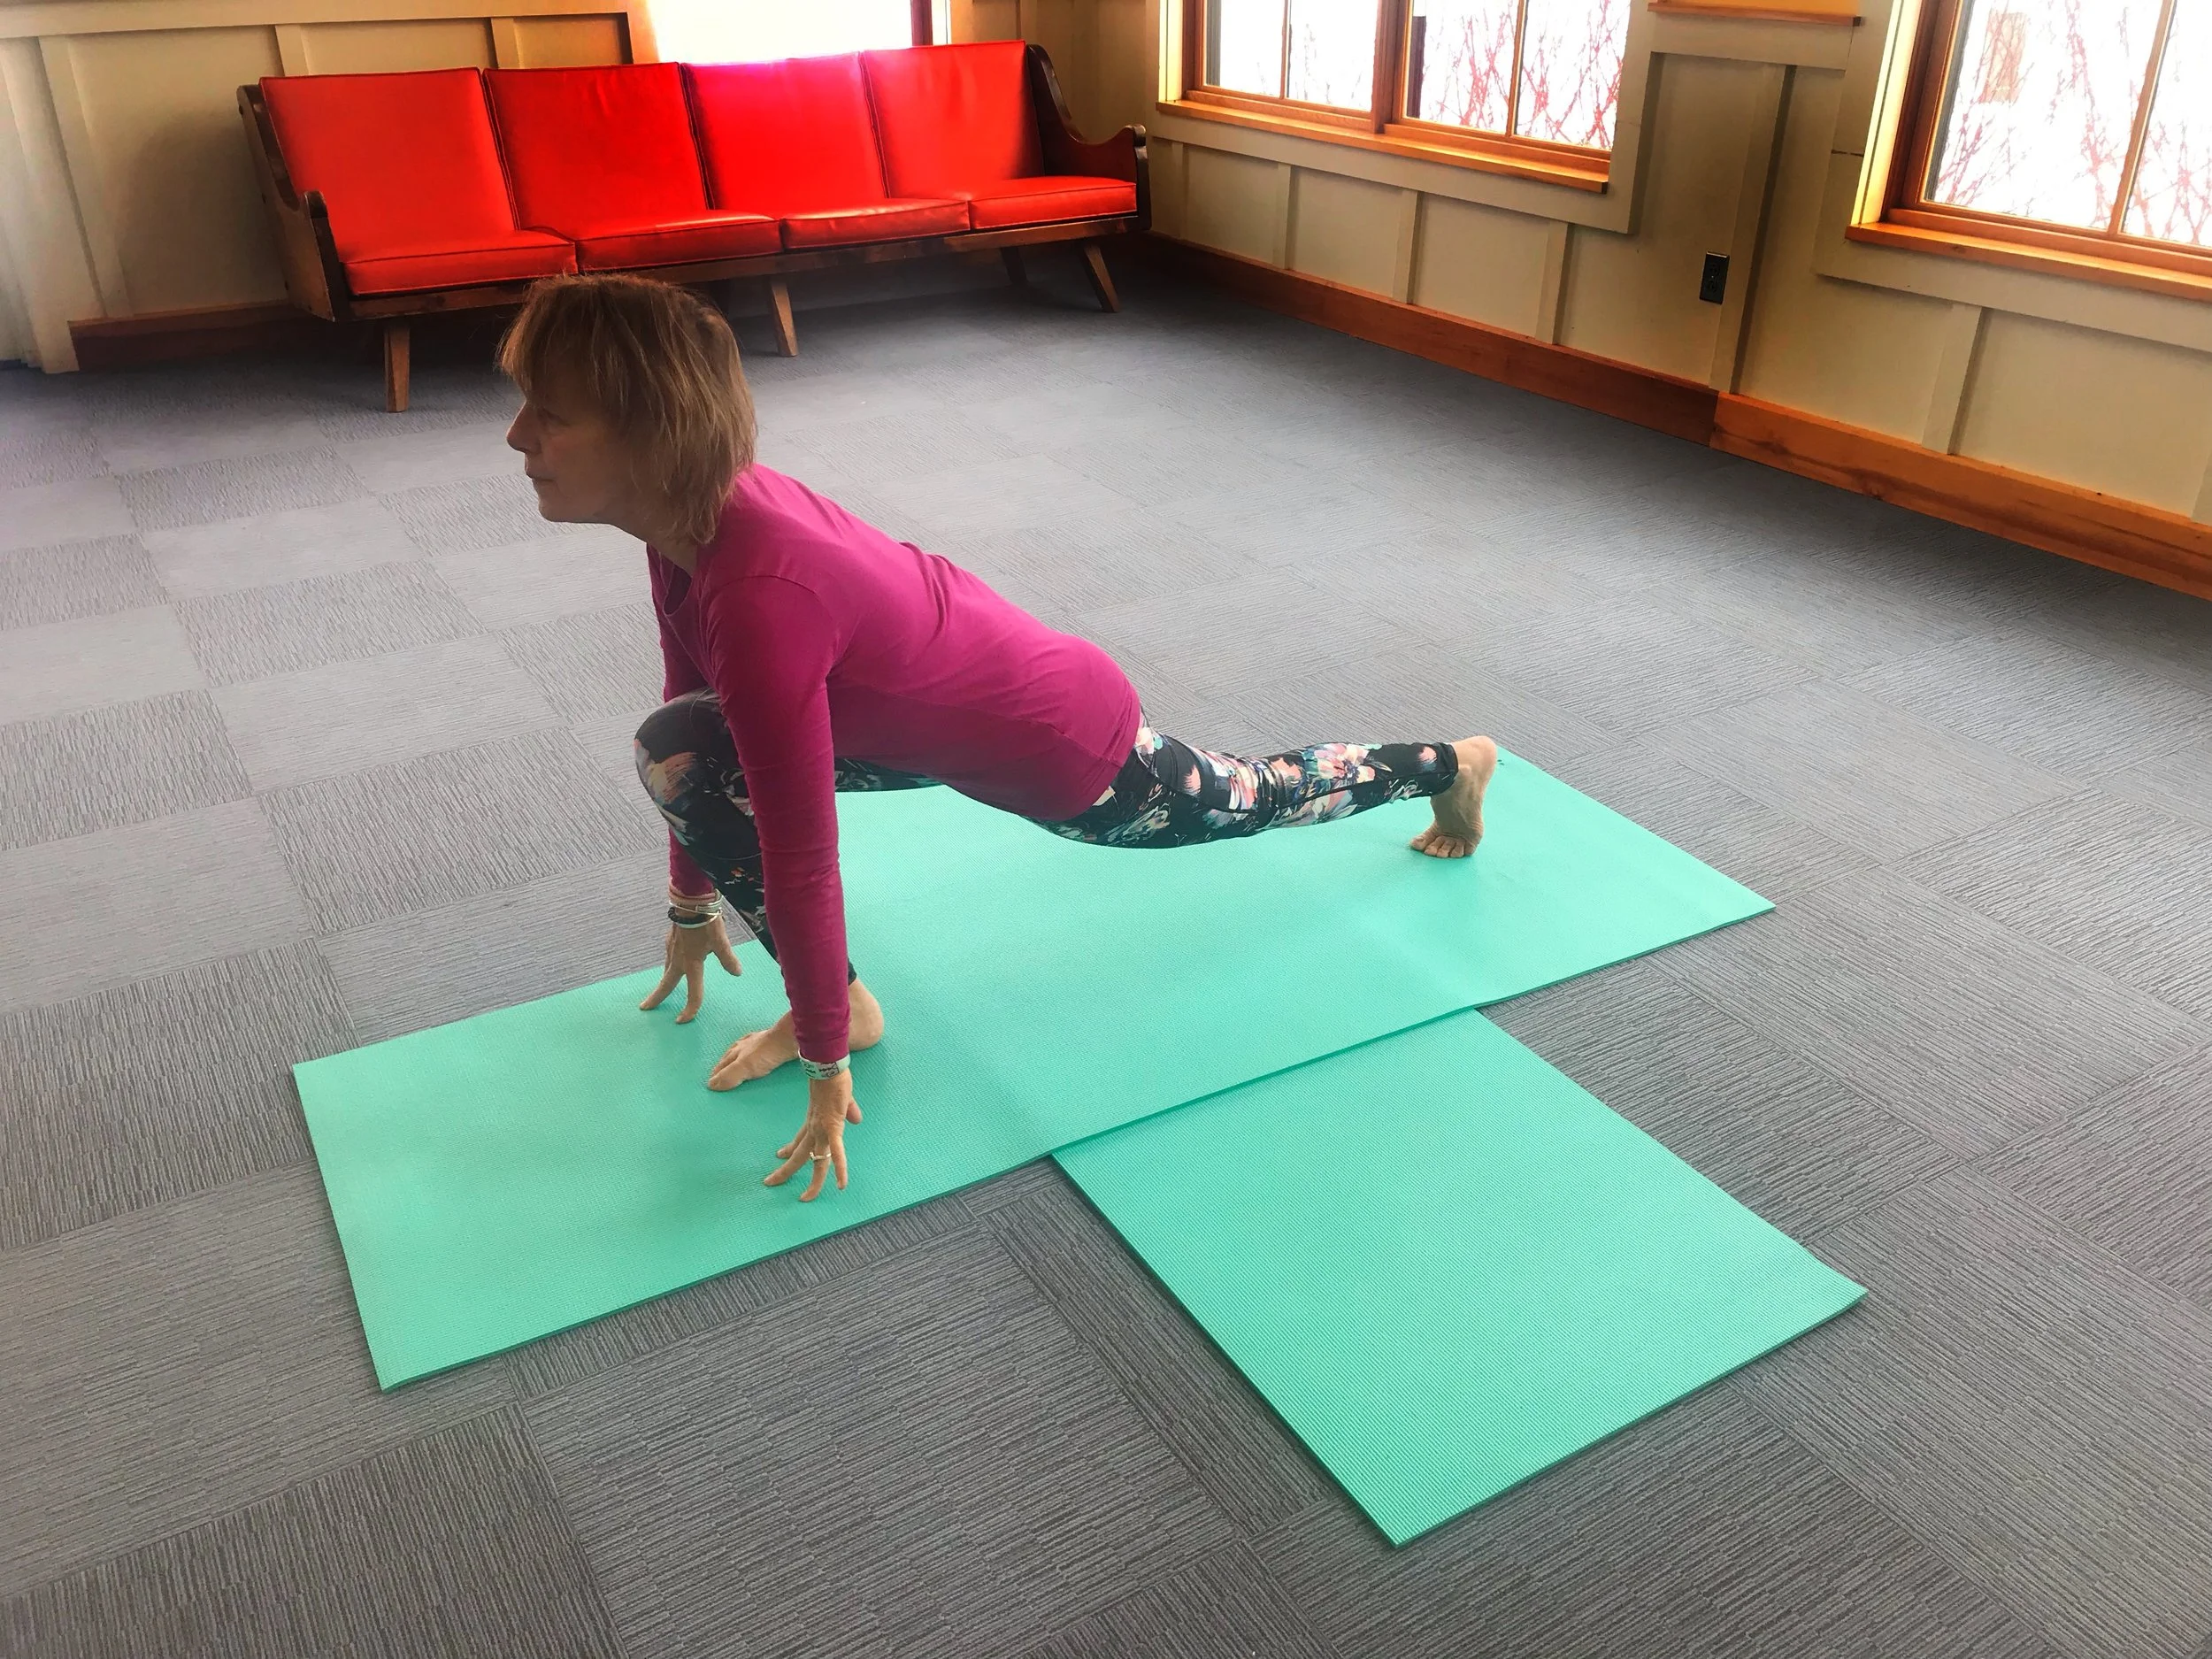
Hiker Yoga Pose #5 – Lunge
How-to: From Stargazer, rotate back foot and bend front knee so ankle and knee align. Lean forward and place one hand on each side of the front foot. Hands may touch the floor, be tented up or supported by yoga blocks or other sturdy object. Shoulders and wrists should be aligned. Weight on the back foot should be on the toes. Push the back knee up to the ceiling.
Benefits: wrist strengthening arms and back
Hiker Yoga Pose #6 – Crocodile
How-to: From Lunge, keep both feet in the same position with front knee and ankle aligned and back knee pushing to the sky. Move both hands to the inside of the front foot. Shoulders and wrists should be aligned.
Benefits: wrist strengthening, arms, and back

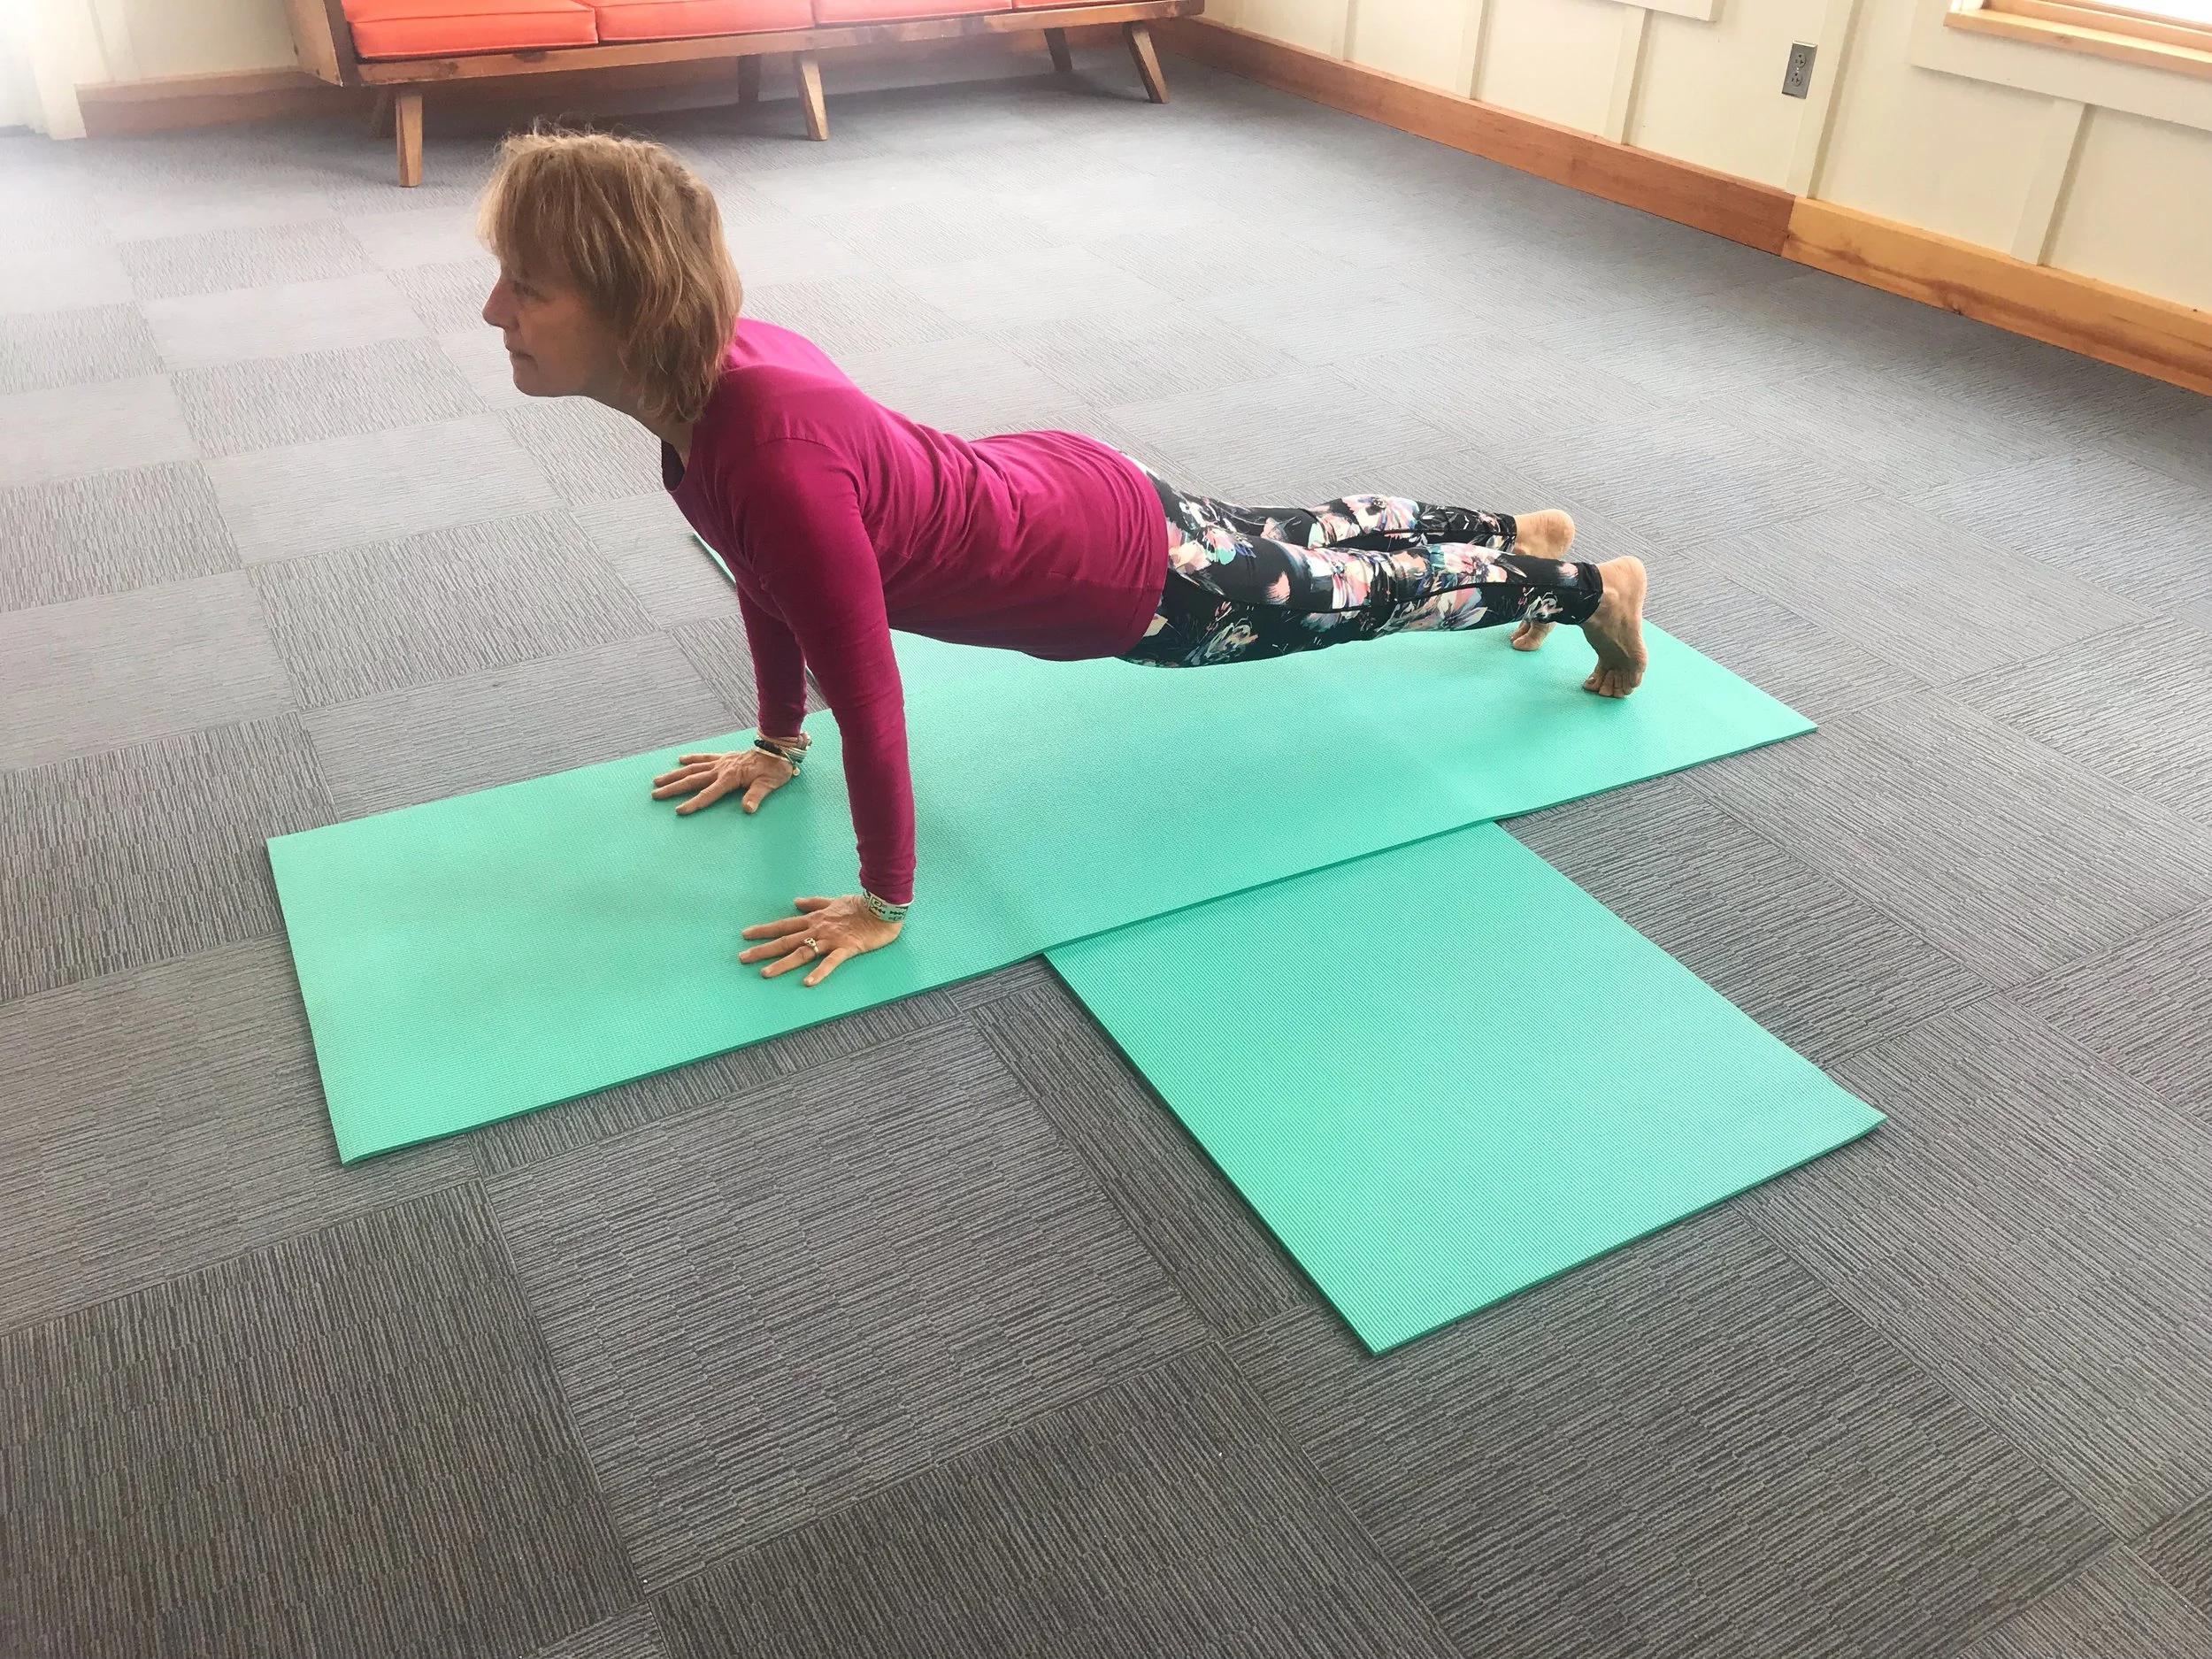
Backpacker Yoga Pose #7 – Plank
How-to: From Crocodile pose, place one hand on each side of the front foot and slowly sweep front foot back. Both feet should be up on the toes. Shoulders and wrists should be aligned, and the back should be straight.
Benefits: back stretch, legs, arms, and heart strengthening.
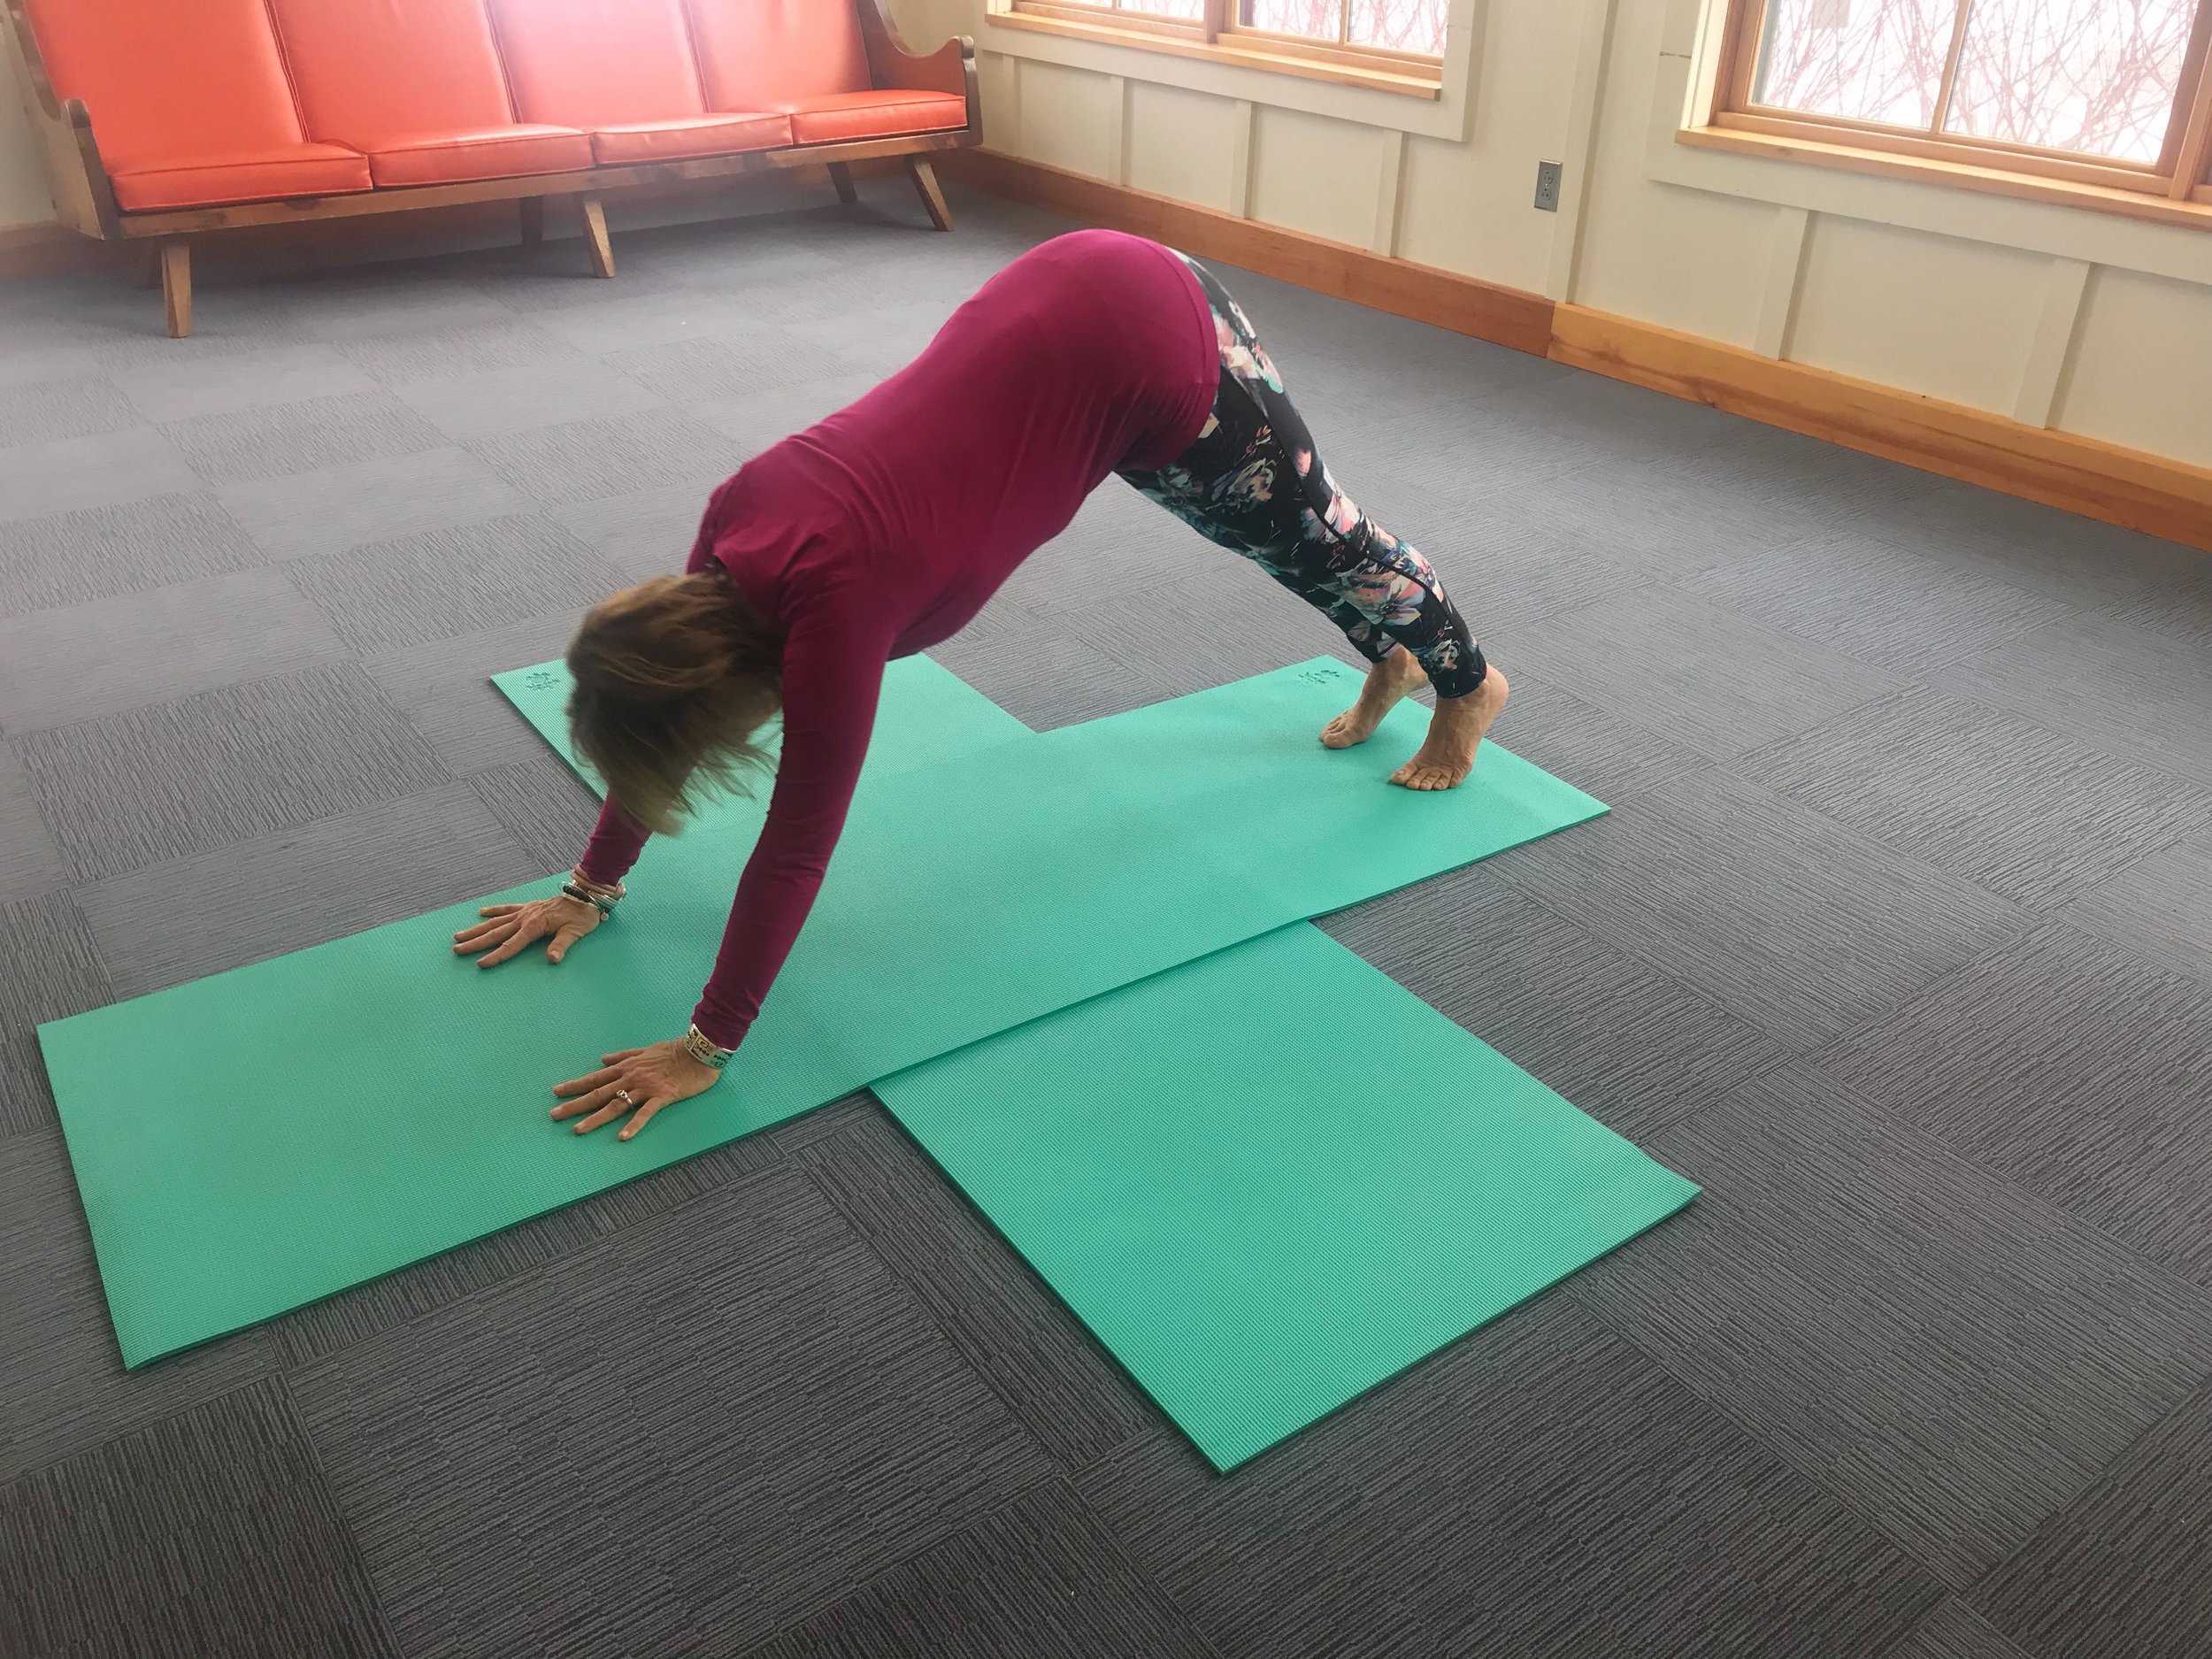
Hiker Yoga Pose #8 – Down Dog
How-to: From Plank, lift butt up to the ceiling and push shoulders towards the floor. Feet don’t always touch the ground fully, but if you want a better stretch in your legs widen your feet and you’ll most likely get them flat. You can also do whats called, “walk the dog”, by slowly peddling the feet. At this point walk your hands up to your feet and to the above 7 poses with the opposite leg as the front leg. Once you get back to down dog go to pose number 9.
Benefits: overall strength upper and lower body, balancing and detoxing.
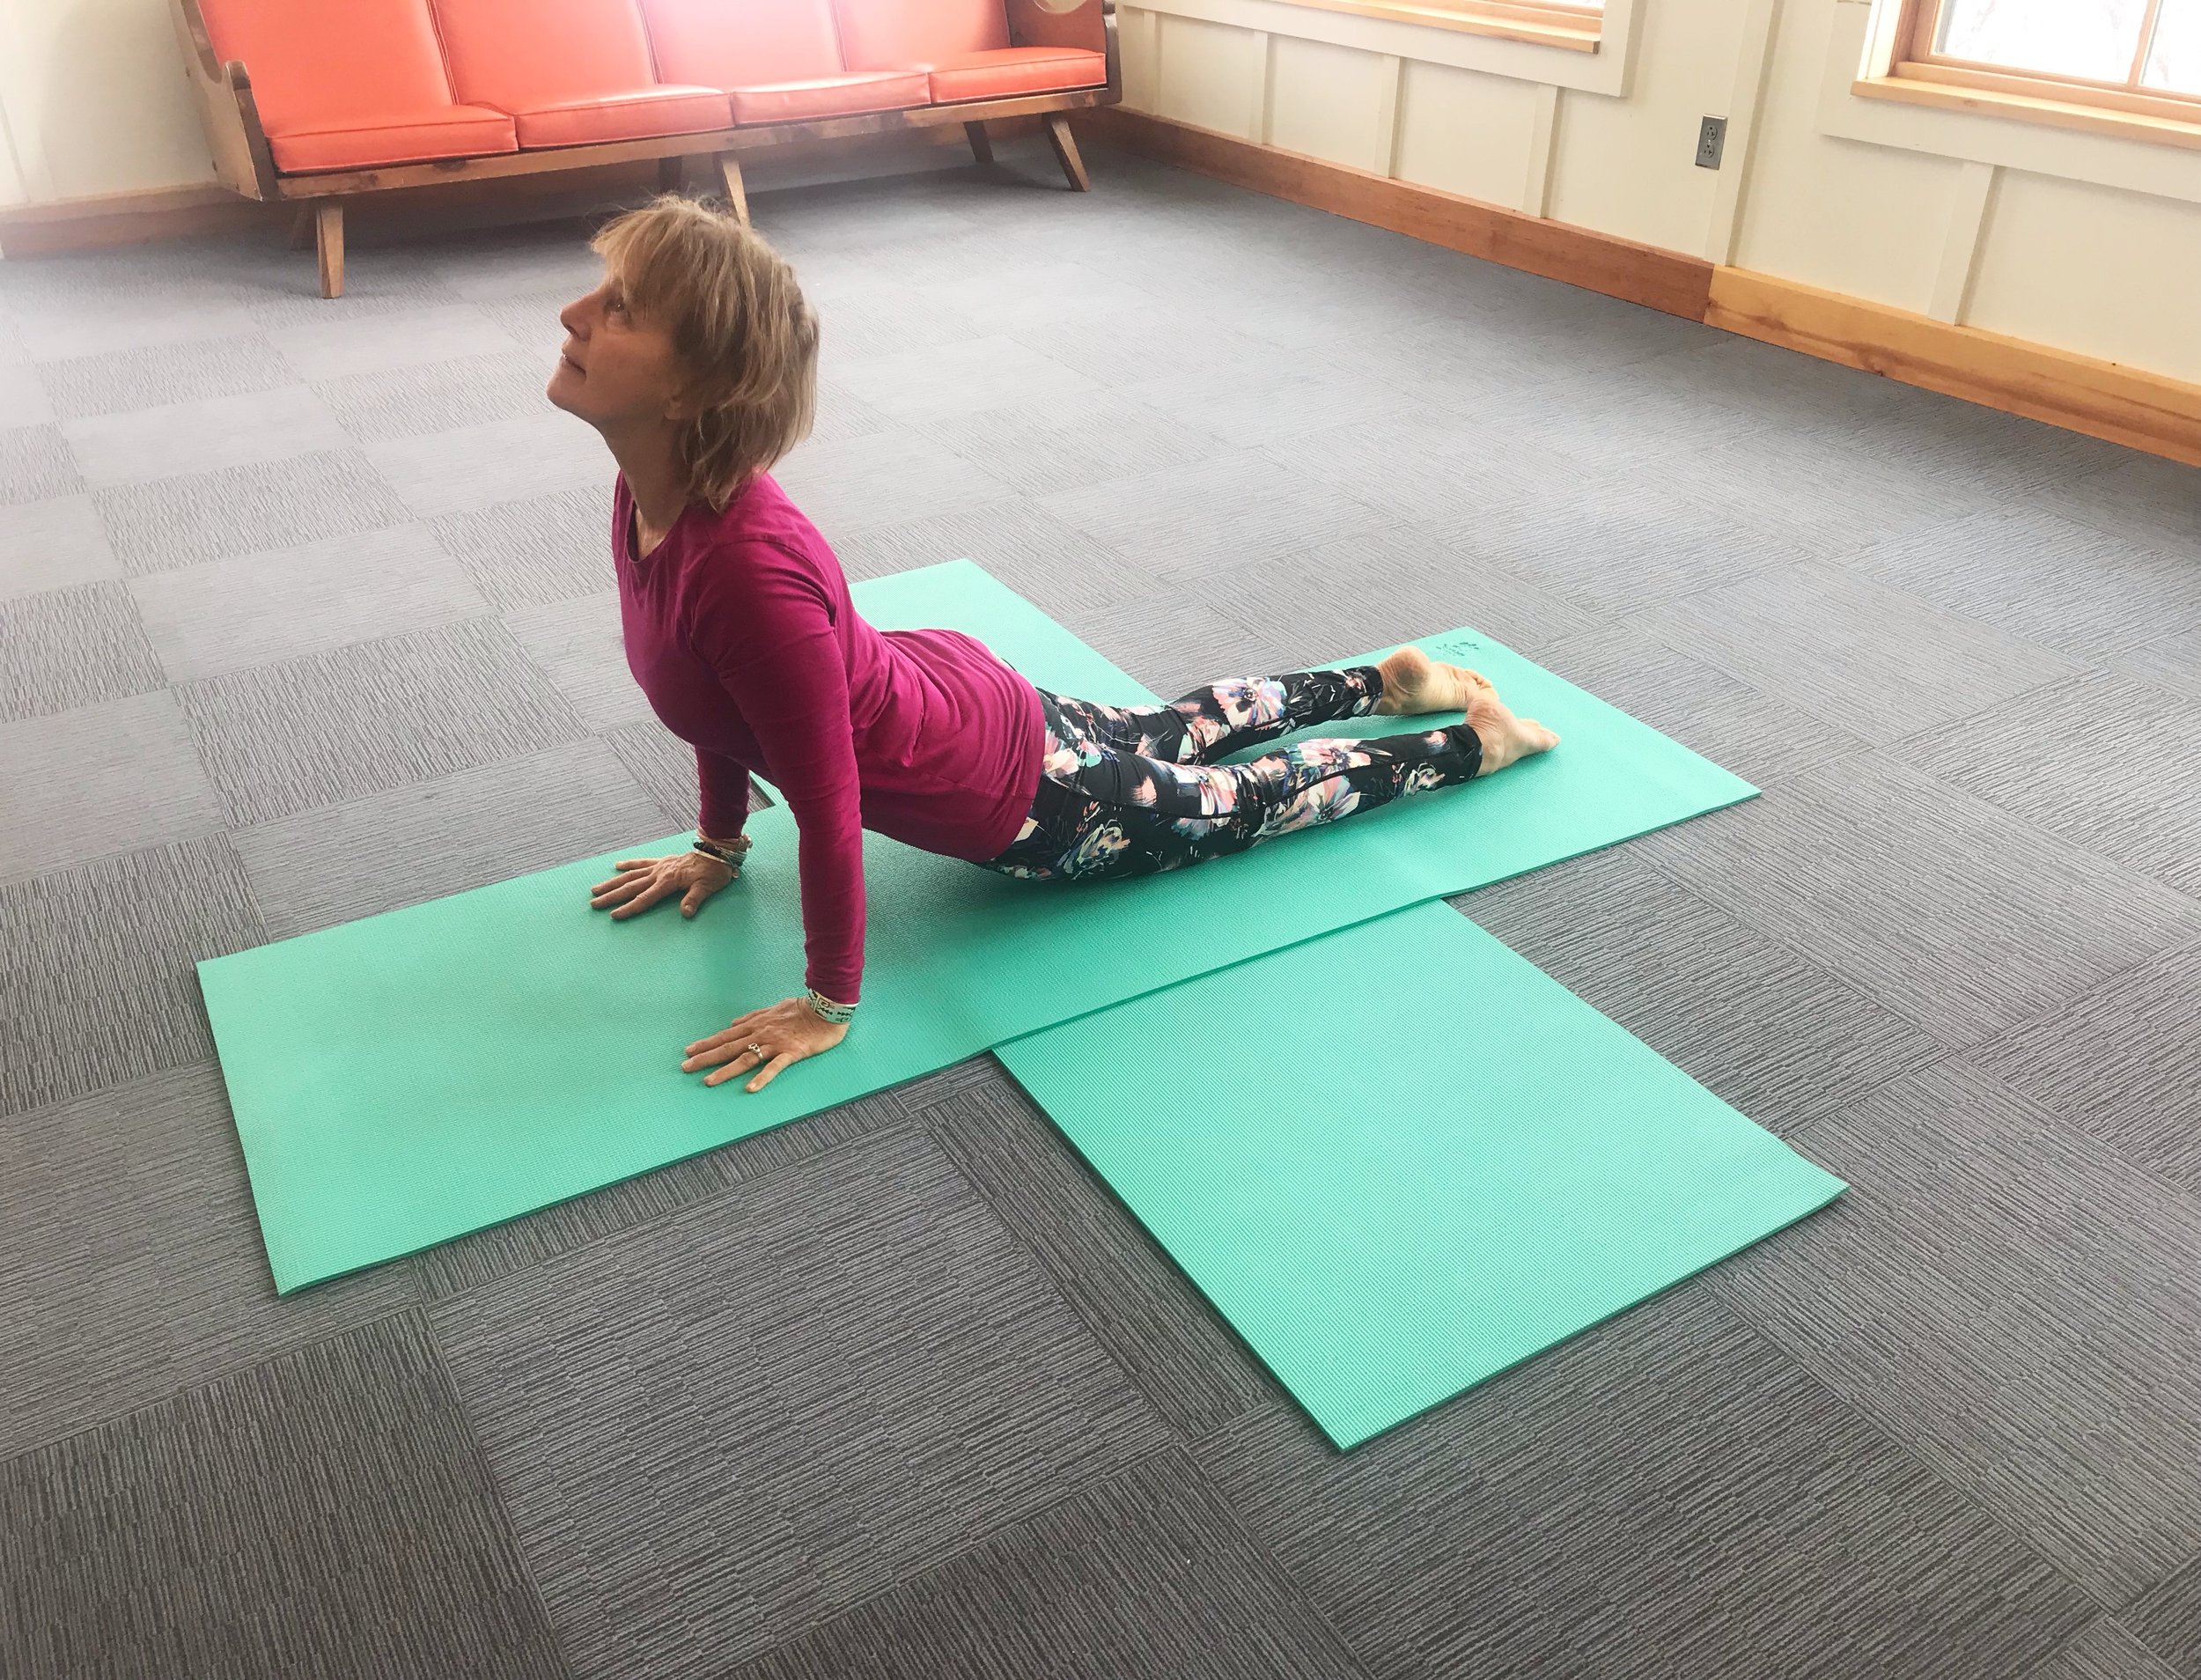
Hiker Yoga Pose #9 – Up Dog
How-to: From Down Dog, lower the hips to the floor, flatten the feet, and push up with the arms slightly while looking up.
Benefits: helps depression, and asthma.
Hiker Yoga Pose #10 – Pigeon
How-to: From Up Dog, push back into Down Dog and raise one leg into the air behind you. Then bring down that leg, touch knee to elbows and place knee between the hands. Push up slightly with the hands. A gentle rocking from side to side motion helps to open up the hips. This yoga pose can also become reclining pigeon by folding at the hips and places the head to the floor, arms stretched out in front or supporting the forehead. Make sure you do both legs for this pose by pushing back into Down Dog and repeating.
Benefits: hips, back and core.

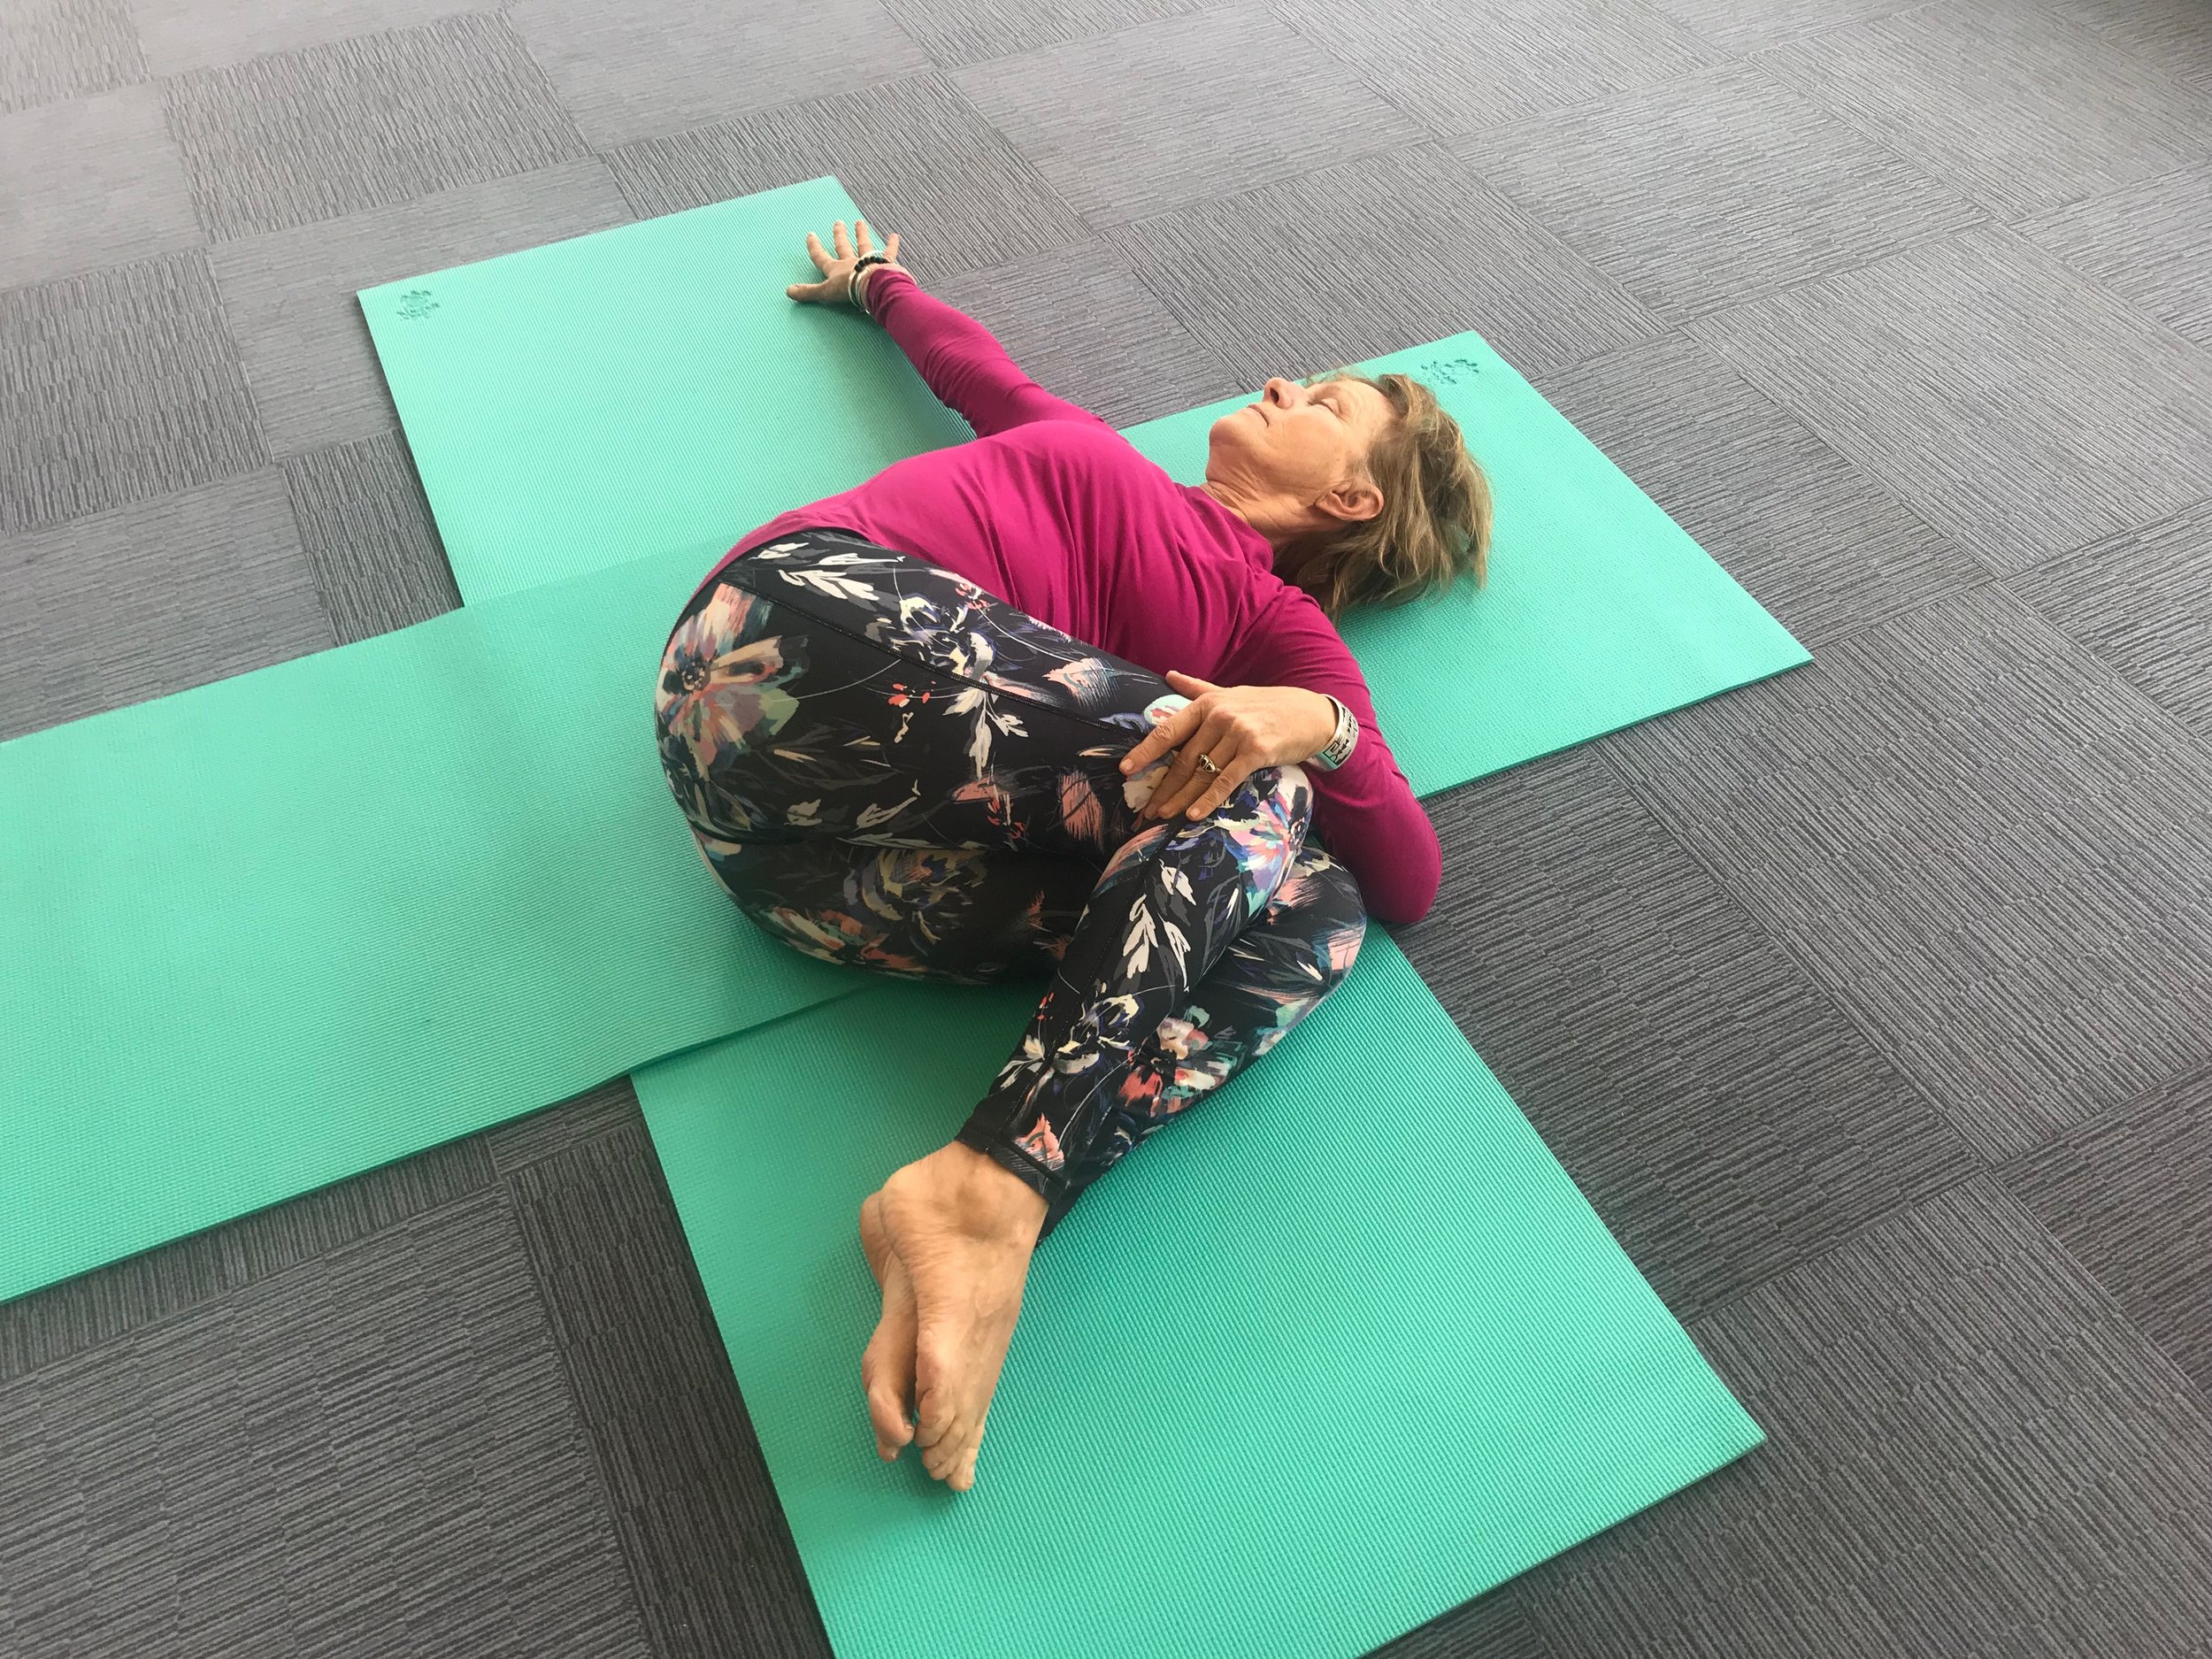
Hiker Yoga Pose #11 – Spinal Twist
How-to: From Pigeon, swing back leg to the front of the mat, so you are sitting. Lower yourself on to your back, and bring your knees to you chest. If your back is sore a slow rocking motion from side to side and be added at this time. (trust me, it feels GREAT!) Then t-out the arms, so they’re even with your shoulders. Slowly bring your legs to one side and place the arm on that side on the knees. Twist and look over the opposite hand arm. If you knees do not reach the ground or you want a deeper stretch, apply slight pressure to the knees with your hand pushing towards the ground. Repeat on other side.
Benefits: major organ flush, hips, core, and back.
I hope these yoga poses help you after your next big hike. Even taking the time to do just a few of these can help you have a better day the following morning.
What are some Hiker & Backpacker yoga poses that help you?